JSON Serialization/Deserialization C#

You don’t need to download or install any external Libraries to serialize/deserialize you Objects to/from JSON. All you need to do is to reference to your project “System.Web.Extensions.dll”.

JSON could be saved in a string object in the following format.

{
    "ID": 108, 
    "StartDate": "2011-04-13T15:34:09Z", 
    "Name": "SN1234"
}

Now you can easily deserialize the previous JSON string into a Dictionary using the following code

using System.Web.Script.Serialization;

var jss = new JavaScriptSerializer();
var dict = jss.Deserialize<Dictionary<string,string>>(jsonText);

Console.WriteLine(dict["ID"]);  //This will output 108

What if your data are more complex ? for example.

{
    "ID": 108, 
    "StartDate": "2011-04-13T15:34:09Z", 
    "Name": "SN1234",
    "Type": {
        "ID": 2
        "Text": "hello"   
    }
}

Deserialization will be like this.

using System.Web.Script.Serialization;

var jss = new JavaScriptSerializer();
var dict = jss.Deserialize<Dictionary<string,string>>(jsonText);

Console.WriteLine(dict["Type"]["Text"]);  //This will output hello

That was how we can easily Deserialize a JSON object. Lets see how we can Serialize to a JSON object.

using System.Web.Script.Serialization;

var jss = new JavaScriptSerializer();
var dict = jss.Deserialize<dynamic>(jsonText);

var json = jss.Serialize(dict);
Console.WriteLine(json);
Multicast PostSharp Aspects C#

PostSharp Aspects are really powerful in applying some useful Aspects like Handling Exception. If you don’t know about PostShap Exception handling Check this Post.

One of PostSharp powerful Utilities is Multicast which is simply applying an Aspect to a whole Namespace with a single line of code .. Magic isn’t it 🙂

You can Multicast an Aspect by simply adding the following line to the Solution AssemblyInfo.cs File under Properties.

[assembly: ExceptionAspect(AttributeTargetTypes = "AOP_Project.Code.*")]

ExceptionAspect is the name of the Aspect i want to insert and “AOP_Project.Code.*” is the target namespace where all the classes under it will have that Aspect while building the solution.

That’s it now you can apply Exception Aspect to all your solution with a single line 🙂

Exception handling using PostSharp C#

When ever we are writing any piece of code we should often handle any exception that could occurs because of wrong data or even a bug in our code. What we usually did was using try and catch and catch any exception that could occurs. Imagine in a large solution how many try and catch you will have to write and even imagine if you need to change the way you are handling these exception how many lines of code you will need to replace.

Thanks to PostSharp now we can simply handle all the exceptions in our system through a single function. By using Aspect Oriented Programming we can simply apply the exception handling to all our code.

I will guide you step by step how we can use PostSharp and AOP to handle all our exception. You will find the source code on the following link. Remember to install the PostSharp before running the solution as the Exception Handler wont work if PostSharp is not installed.

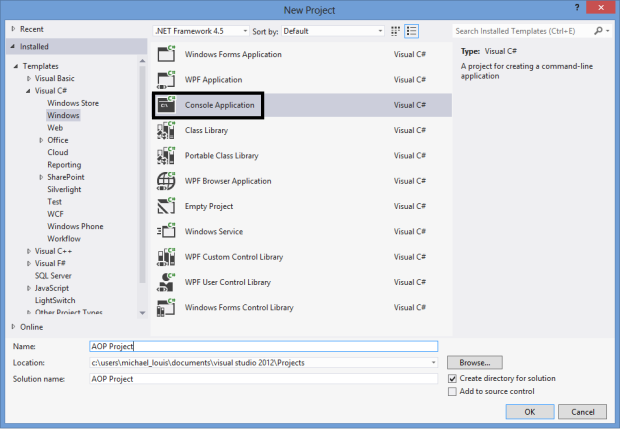
  1. Creating a Console Application Project
    In Visual Studio menu select File>New>Project and select the “Console Application” template.
    1
  2. Installing PostSharp on our Project
    In Visual Studio menu select Tools>NuGet Package Manager>Manage NuGet Packages for Solution..
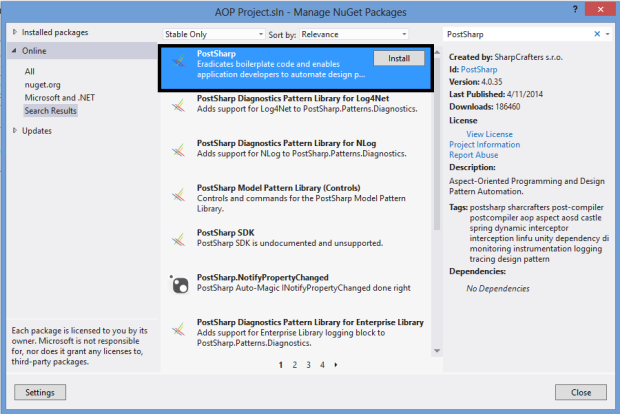
    After the Manage NuGet Packages Open Select Online on the Left Then Search for PostSharp and click Install.
    2
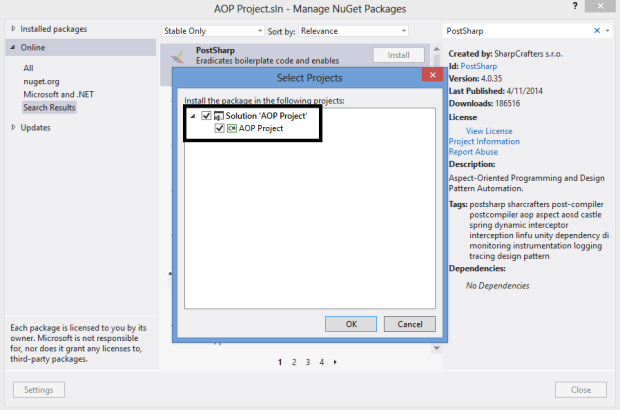
    It will ask you for the Project you want to install PostSharp in, make sure your project is selected.
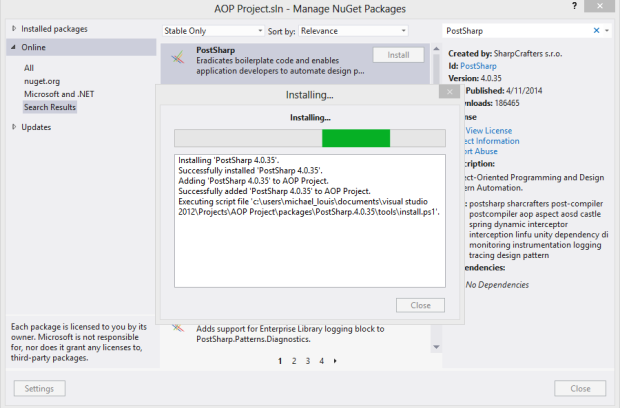
    3 Wait until it finish downloading and Installing PostSharp. It should not take long.
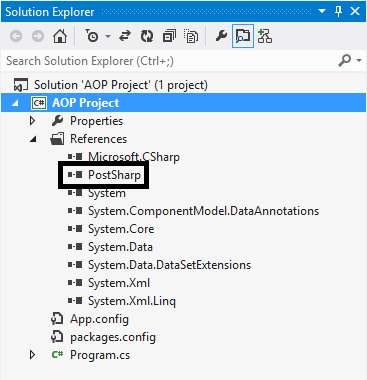
    4If you did everything right you will find a reference in your project to PostSharp
    5
  3. Creating our Exception Aspect Class
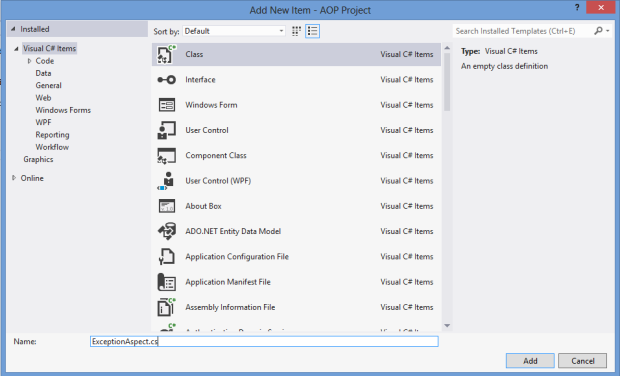
    Right Click the Project>Add>Class and name it whatever you want.
    6 Now we need to implement OnExceptionAspect which has a function OnException that we need to override to however you want to handle Exceptions.

    
    using System;
    using System.Collections.Generic;
    using System.Linq;
    using System.Text;
    using System.Threading.Tasks;
    using PostSharp.Aspects;
    
    namespace AOP_Project
    {
           [Serializable]
           public class ExceptionAspect : OnExceptionAspect
           {
                   public override void OnException(MethodExecutionArgs args)
                    {
                           Console.WriteLine(&amp;amp;amp;quot;Exception : &amp;amp;amp;quot; + args.Exception.Message + &amp;amp;amp;quot; at &amp;amp;amp;quot; + DateTime.Now);
                           args.FlowBehavior = FlowBehavior.Continue;
    
                          base.OnException(args);
                    }
           }
    }
    

    as you can see in the first line i toke the exception from the args and i wrote it to the console then i specified what will happen with the flow. You can set it to Continue then the debugger will continue as if no exception occurs, you can also throw the exception if you want.

  4. Using Exception Aspect in any function.
    In the Program.cs we will create two function on that has the Exception Aspect aspect and the other doesn’t and they both throw Divide by zero exception and lets call them one by one and see the what happens.

    using System;
    using System.Collections.Generic;
    using System.Linq;
    using System.Text;
    using System.Threading.Tasks;
    
    namespace AOP_Project
    {
    class Program
    {
    static void Main(string[] args)
    {
    FunWithAspect();
    
    Console.ReadLine();
    }
    
    [ExceptionAspect]
    public static void FunWithAspect()
    {
    throw new DivideByZeroException();
    }
    
    public static void FunWithoutAspect()
    {
    throw new DivideByZeroException();
    }
    }
    }


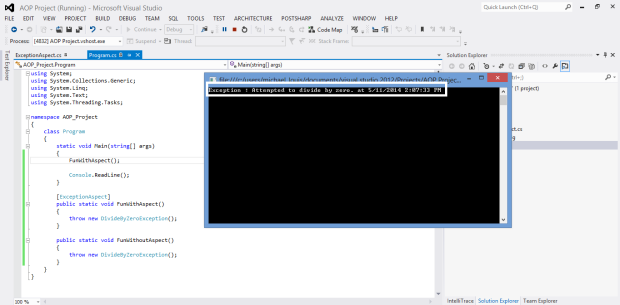
    If you run the program now you will see that the exception is caught by the Exception Aspect and it is written to the Console.
    7
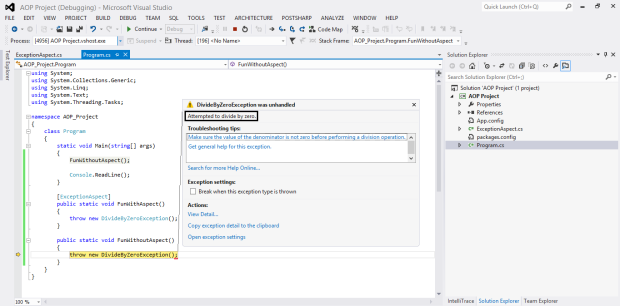
    Now try to run the other function that doesn’t have the ExceptionAspect you will see that it will throw the Divide by zero exception and the debugger will stop at this line.
    8

You can also put the Exception aspect to the whole class and any exception inside that class will be caught by our ExceptionAspect.

Moreover you can apply the Exception Aspect or any other Aspects to a whole Namespace with a single line of code 🙂 It’s something called Multicast Check this Post if you want to know more about it 🙂

Configuring ASP session state on SQL server

This is a brief to the point note on how to setup ASP session state to use SQL server to store session information.

  1. Open Visual Studio CMD and run the following command.
    For SQL Server with Windows Authentication Security:

    aspnet_regsql -S 'serverName' -E -ssadd -sstype p

    For SQL Server with SQL Security:

    aspnet_regsql -S 'serverName' -U 'UserName' -P 'Password' -ssadd -sstype p

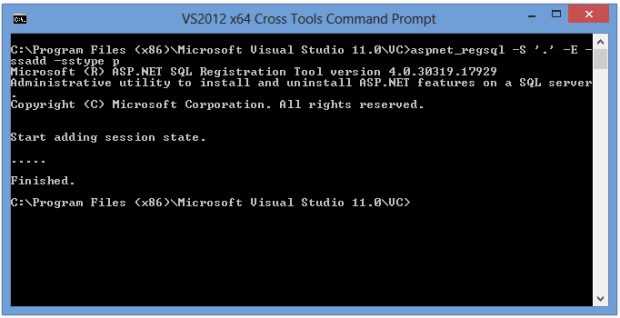
    1
    This command will create the ASP Session State tables in the SQL Server. You will find in the figure above that i have used ‘.’ in the ServerName as i am pointing to the Local SQL Server on my machine.
    If you don’t have visual studio CMD you can still open the normal CMD and navigate to the .net framework “Cd ‘C:\WINDOWS\Microsoft.NET\Framework\v4.XXX’ ” then use the aspnet_regsql

  2. Now after having our tables ready we need to reconfigure our web.config to change the session mode to SQLServer.
    For SQL Server with Windows Authentication Security:

    <sessionstate mode="SQLServer" timeout="20" allowcustomsqldatabase="true" 
    sqlconnectionstring="Data Source=Server;Integrated-Security=SSPI;" cookieless="false">

    For SQL Server with SQL Security:

    <sessionstate mode="SQLServer" timeout="20" allowcustomsqldatabase="true" 
    sqlconnectionstring="Data Source=Server;User ID=UserID;Password=Password;" 
    cookieless="false">

That’s it, Now you have your ASP session stored in you SQL server 🙂

Run Code on Another Thread , C#

When we have a certain function that takes a long time for example uploading a file to the server, we don’t want the user wait for that function to finish. We can instead run that function in the background on another thread.

The easiest way of running a function in the background is using ThreadPool.QueueUserWorkItem.

System.Threading.ThreadPool.QueueUserWorkItem(delegate {
   // Write your Code that will run in background here 
}, null);

Allow Multiple Remote Sessions on Windows Server

By default Windows server allows only a single session to be connected remotely to the server. You can change that by allowing two session to be connected on the same time.

1) Press the Windows Key + R then type MMC.exe

2) File -> Add/Remove Snap-in -> click on Group Policy Object -> Add -> Finish -> OK

3) Double click Computer Configuration -> Administrative Templates -> Windows Components -> Remote Desktop Services -> Remote Desktop Session Host -> Connections.

4) Set the Limit Number of Connections to 999999

5) Restrict Remote Desktop Services users to a single Remote Desktop Services session = Disabled

Now you can access the Server remotely with two Sessions 🙂